RealFlight Transmitter InterLink/Interface Adapter for Multiplex
Summary
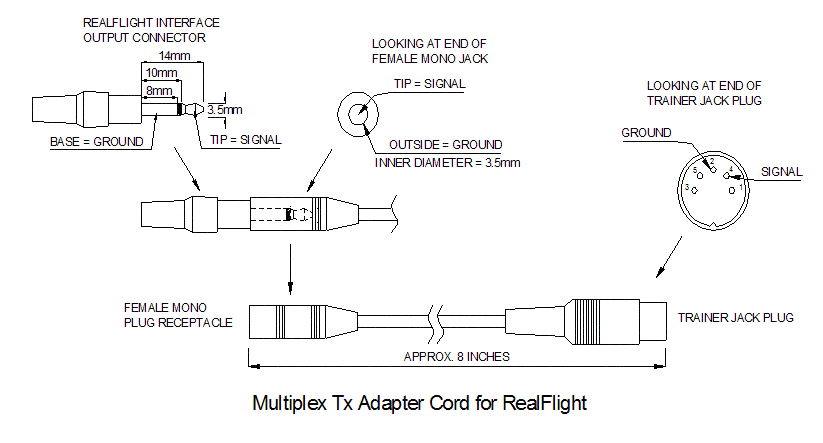
The following is a description for how to assemble an adapter cord to connect a Multiplex transmitter with the parallel port transmitter interface and the InterLink controller for RealFlight. For all instructions, reference the diagram below.
Resolution
Necessary Components
- One 5-pin round male connector compatible with Multiplex transmitter trainer jacks. This should be very similar in style to the plug used on Multiplex trainer cords.
- One female mono plug receptacle, compatible with the dimensions shown for the "RealFlight Interface Output Connector" as shown in the diagram. NOTE: it is important that the female receptacle has an inner diameter of 3.5mm, a depth of 14mm at the tip, and a depth no greater than 8mm for the base.
- Adequate wiring to connect both jacks together. Wire should be copper, having a high strand count. Do not use single strand wire. Two conductors will be required; one conductor for signal connections, one conductor for ground connections.
- Large and small shrink tubing
- Wire strippers
- 60/40 rosin-core electrical solder
- A 40-watt soldering iron
Assembly Instructions
- Cut each conductor to approximately 8 inches in length.
- Strip approximately 1/4 inch of insulation away from each end of each conductor. Twist the bare strands of wire tightly on each wire end.
- Cut enough pieces of shrink tubing to completely cover each solder connection. Make sure to slide the tubes over the wire ends BEFORE making solder connections.
- "Tin" each end of bare wire with 60/40 rosin-core solder and a hot soldering iron. This is simply to apply a small amount of solder onto the bare wire end to prepare it for soldering onto the jacks.
- "Signal" connection:
- Solder one end of the signal wire to pin #4 on the "trainer jack plug". IMPORTANT: this is the pin located at the 2 o'clock position when looking at the end of the plug itself, as shown in the diagram.
- Solder the other end of the signal wire to the center connection on the "female mono plug receptacle".
- "Ground" connection:
- Solder one end of the ground wire to pin #2 on the "trainer jack plug". IMPORTANT: this is the pin located at the 12 o'clock position when looking at the end of the plug itself, as shown in the diagram.
- Solder the other end of the ground wire to the outside connection on the "female mono plug receptacle".
- Slide all shrink tubes over their respective connections. Apply heat with a heat gun or hair dryer to shrink the tubing over the entire solder connection. This will provide a good electrical insulator for the solder connections, and a good strain relief for the physical connection.